SPARK PLUG REPLACEMENT
(plus valve cover bolts and oxygen sensor - DODGE CARAVAN 3.3L)
I presume you have a service manual, though I may include brief pointers from it to make this advice more cohesive.
(My experiene is with 1993 1/2 through 1995 engine control system 3.3L, I expect 3.8 is the same but 3.0L is NOT at all.)
All directions are as viewed from the driver's seat.
An alternative way to get at rear plugs if you are removing the intake manifold which allows access to rear injectors and rear valve cover.
Suggested tools:
- For spark plugs:
> 3/8" drive ratchet wrench
> standard spark plug socket (regular size 13/16", no swivel, rubber retention insert in good condition but not too tight, preferably a longer than normal socket to be able to pull it off of installed plug, perhaps modify standard socket with holes to a pull wire)
> medium and long extension bars (clearance to firewall for wrench is a bit tight, normal medium extension is 3"), OTOH it may be easier to line the plug up to start threading if you use a long bar as you won't vary angle as much, that may give you more wrench toom as well.
> thumbwheel optional, to speed turning plug once it is loose (but do not push it all the way into the socket, as pulling it out may pull the socket off of the plug). It is desirable as ratchet wrench has tendency to not ratchet when turning plug is easy, but thumbwheel takes more hand room.
> pliers to rotate wire boot to loose it to ease pulling it off (I and Chrysler say 'rotate', then it is easier to pull off)
> air supply with long nozzle (to blow junk out of spark plug well)
> anti-seize compound for high temperature
> desirably a photo of the area of the right rear spark plug, especially one looking down showing the stud of the brace bracket and the plug.
(note it is closer to the engine than the lateral brace is, and is beside a lug of the exhaust manifold)
> the "Oxygen Sensor - 3.3L Engine" illustration from the Chrysler service manual section 14, to help you visualize where the plugs are relative to bigger pieces, though it may not show all interfering parts. Note it is from the rear whereas my photo is from above.
> long tray or a grabber to retrieve tools and plugs when you drop them trying to put them on the plug
> long skinny arms ;-)
> and protection for them, you'll be rubbing against oily engine parts as you reach far up or down.
(perhaps light motorcycle leather jacket, perhaps arm sleeves sold for sports, ideally leather ones sold for working on vehicles)
> lights, mirrors, and preferably a video inspection camera of wand type (hard to prop mirrors up while having both hands free).
> spark plug gapping and adjusting tool (ensure includes .050, Performance Tool W80522 includes a little brush)
> You may want a good wire puller, preferably that locks onto the plug wire below the bend in it and has very good grips for your hand as the tight space makes gripping difficult and there is little room to pull, though I have pulled the wires off with my bare hands - the aft RH plug is especially difficult with bare hands. Do twist the wire first to loosen grip on plug (it takes turning though a big angle). And you have to get the wires back on - see below.
> thumb turn wheel that fits in place of ratchet wrench, for feel installing plugs and for quicker turning
> voltohmeter to check resistance of plug wires
> perhaps something to stand on to reach the rear plugs, depending on your arm length and if you have raised the vehicle to reach the LR plug wire from below to loosen it.
> an experienced touch to start threading the replacement plug in correctly.
Let the engine cool down before working on the rear plugs and bolts, as you'll be touching the exhaust manifold.
Parts
I recommend using new spark plugs and wires because of access difficulty.
And use 'dielectric grease' on plug and coil terminal, to resist corrosion.
I have good success with RN14MC5 plugs, which are specified for my US-emissions 1994 and my Canadian-emissions late 1993. (The 1993 has an alternative of RN16YC5 listed on the underhood emisssions label, that is a higher heat range and a longer nose projection.) 5 is 0.050" gap, C is Copper.
There is an RN14MCC5 plug (two C characters for 'Double Copper' in electrodes.)
But do not use fine wire platinum plugs, no matter what some fools in Allpar claim, as dual polarity ignition system will rapidly erode the fine centre electrode.
I suggest a very small amount of anti-seize compound on plug threads.
- For valve cover bolts:
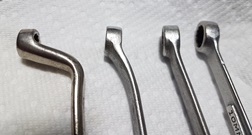
> 10mm wrench with open and closed ends (closed end vertically offset, see photo of offset closed ends:)
* Craftsman offset end with slight angle (short, open-closed ends)
* Craftsman offset end with slight angle (long, dual ended)
* Craftsman offset end with arch (long, dual ended)
(Those samples have progressively thinner surround of the bolt head in order listed.)
* 'DOWIDAT No. 2' offset end with step (long, dual ended)
(I've seen the offset on MasterCraft (Canadian Tire brand) but it seems to vary with batch. Princess Auto sells a set of wrenches with the step. Snap-On company may sell such labelled 'box end offset'. The step will be better if the valve cover flange is high or close to the bolt. Short may have an advantage in the tight space.)
> low profile ratchet (1/4" drive)
> 10mm short socket
> long extension bar for the ratchet (may need short one as well)
> swivel extension for the 1/4" ratchet (separate from socket), try to limit its movement with rubber on the mechanism (I've used black electrical tape and other tapes, and garden putty), there are ones spring-loaded to centre (perhaps Nates Tools of Torrance CA sells them). A flexible ratchet extension bar does not help, I'm going to get some 1/2" ID soft copper tubing to go over it, bending it to give it a firm angle but allow flexible bar to turn within it. A 45 degree copper elbow for flex shaft to turn in does not work as end of shaft is too long for it to go through elbow - could it bent the elbow? Soft tubing is a better approach if can find some.
> there are 'crowfoot' wrenches with vertical projection like the wrenches I describe above, that would help for some bolts instead of trying angled (u-joint), Bonney Tools made some, SnapOn Tools made some ('deep' is the offset type). Some crowfoot wrenches are open-sided for tubing flare nuts, and may be 12-point: not as good for us.
> a small flexible light wand to shine on area of bolt head from sides, as your wrench and hand will obscure it from above.
Access
To work on spark plugs:
- disconnect PCV hose and tuck under TCM.
- disconnect harness to oxygen sensor and tuck away
- remove MAP
Print my photo of the RR plug location. You can feel the brace, and look at front of engine for angle of plug (as head is same but rotated 180 degrees).
Print manual page showing all three rear plugs from behind.
I'll emphasize the rear plugs and cover bolts as they are a challenge, but do the front ones first so you learn something of the geometry of the parts, which are reversed for the rear head. SPARK PLUGS (You'll be working almost blind thus it is difficult to judge the angle of the plug and your wrench. After you've spent five hours and/or done the job five times that month you'll do better at it.)
Memorize orientation relative to the adjacent higher one of the two manifold runner bolts (strut stud for middle rear plug). Refer to photo of middle rear plug, relative to a strut, looking down from front of vehicle, access to right rear plug is from forward of the strut. Your socket extender bar will be roughly near the stud but the plug hole is to the right because of its angle in the manifold. The aft plugs are angled opposite to the front ones, as if the same head casting was used, with a bend & tab in the wire as the front ones have. Aft plugs angled to left, front ones angled to right. Looking at the front ones you can also see how far they are recessed beside exhaust manifold legs, and orientation relative to manifold bolts. CLEARING JUNK OUT OF THE WAY TO WORK FROM ABOVE SPARK PLUG WIRES VALVE COVER BOLTS OXYGEN SENSOR POSSSIBLE ADDITIONAL FACILITATION
Changing rear spark plugs on the Chrysler 3.3/3.8 litre engine in early 90s Caravans is very awkward.
Don't try unless you are quite familiar with how threads feel when correctly mated. You can practice on the front of the engine. Note that heads are the same but reverse-handed thus angle of plug is opposite between front and back.
Use a bit of anti-seize compound before putting plug in. Be careful not to put sideload on the plugs, to avoid breaking the insulator.
Of course look at condition of removed plug, traditionally light tan colour is good but today's gasoline additives may cause some reddishness.
You can do the aft leftmost two by working from underneath on the back side of the engine (it does not take much lift of the vehicle for appropriate reach when crawling under on your back, to reach standing up would take a high lift), using a non-swivel socket with medium extension bar and preferably a 3/8" ratchet drive.
The rightmost is a long reach from either below or above, I prefer working from above while visualizing geometry. Taking and printing a photograph might help.
I recommend blowing air into the well around the plug to remove sand and pebbles that would fall into the cylinder once you've removed the plug.)
For the centre aft one you can get both hands in, one each side of exhaust take-down pipe.
- remove MAP sensor (use a wrench on the pseudo bolt head aft side, note orientation with connector to right, sensor is marked UP, use a bit of teflon thread tape on reinstalling)
- detach ground strap terminal from firewall, unless you've replaced it with much longer
- detach hose to PCV valve (tuck it under the TCM)
- tuck/tie up any loose wires out of the way, and use wire or something to pull heater hose to the left to get more clearance for wrench
(I like to use a turning knob loosely inserted, instead of socket wrench to screw plug much of the way in to speed the job.)
- the fitting securing the oxygen sensor harness to the intake manifold is a scratch point, it should be moved to the firewall.
You can then reach the two aft left plugs with your left hand. (On vehicles without ABS you may be able to reach around with your right hand under the throttle body, or detach the vacuum unit for the EGR valve and put it out of the way to reach over the TB (but be careful with those thin plastic vacuum lines).
To thread the plug in I feel where the plug points relative to the manifold bolts (using the fwd side of the engine to learn), as I can feel them (different on each side of plug, points closer to the higher bolt). It is fairly easy to feel the LR plug's hole with finger, compared to other plugs, but to remove the wire you many need to go under the vehicle.
To remove them from the spark plugs, it helps to twist them, then use pliers or special grabber tools.
Similarly from the coil, though you can pry on the boot with a screwdriver.
You should examine ends for rust which indicates lack of contact, and measure resistance, as they do go bad.
They are changeble if you use the access from above method after removing pieces.
One problem when changing plugs is feeling if the wires are fully on the plugs, first check that the contact sleeve has not been pushed back in the outer casing, test the fit of it to plug terminal with a spare or old plug to ensure diameter is correct (adjust with pliers or screwdriver as needed), then expect to push hard. (Experiment with a front one to get a feel for rigidity of a properly mated wire, there should be a click - before that you are pushing the wire shround over the ribbed spark plug insulator.) The right rear one will be especially difficult to get on due limited finger room.
Do inspect the metal contact clip in each end of the wire, if it has not been properly pushed on the plug it will corrode. And the distributor end has to be seated fully, you are pushing the shroud over the boss on the coil (the design at both ends is to keep moisture out but it makes seating more difficult).
Checking resistance of plug wires is a good idea, from memory they should be between 5 and 15 kohms depending on length (that's resistance type wires of course).
While you have access to the back side of the engine, whether from above after removing pieces or from below, tighten the centre aft bolts of the rear valve cover. As your tool choose either a 10mm wrench of medium length with open and closed ends, one angled with a bit of offset as is common on closed-end wrenches (as the cover has a lip around the edge), or a 10mm socket with very low profile ratchet. BUT it is a long reach.
OTOH, if you want to buy tools, Snap-On has a combination of closed end wrench with swivelled socket on the other end (no ratchet). Otherwise the offset closed-end wrench is best as the left end and next to right end bolts are obscured from above/right by things, go at them from the left.
The lip on the valve cover prevents use of an integral ratchet closed end wrench, proximity to the cover prevents use of a normal ratchet wrench as diameter too large. The valve cover is above the spark plug area of course, and the intake manifold hangs well over the back of the engine so you cannot reach over from the front.
You should be able to reach the middle two from the back side (they are approximately in line with the exhaust manifold legs), the RH one is especially difficult for people with short wide arms: using wrench with left hand though not much swing room, perhaps getting the wrench in the cover edge groove then sliding the wrench to the right until it hits the head, then lifing it up on top of the head and rotating plus wiggling until it sits down over the head (don't laugh, I've succeeded with that).
(You may be able to use a socket wrench with right hand but that is awkward if wiring is lying over the bolt head and because space between exhaust manifold joint and PS pump tubing is narrow.
The corner ones are reachable from under the hood, though the left one might be just as easy from underneath where you will be anyway. The right one is directly under a hole in the alternator mounting bracket, you may have to use short and long extension bar togeter.
(For trying to curb oil leaks in general, note there is a grommet toward the right end of the aft valve cover where the PCV valve hose, it may need replacement, best done before it gets very hard. Perhaps easier with alternator out.
- Back around the front of the engine (well, start there first so you know which ones are left to do from the rear), you can reach these valve cover bolts:
> with a 1/4" swivel and very long extension on a 10mm socket, the right most aft bolt of the rear valve cover (through the cutout in the alternator bracket, might not need swivel)
> the left-most aft bolt of the rear valve cover (with care)
> and with maneuvering the front RH bolt of the aft valve cover (or try a 10mm closed end wrench with a bit of offset as exists on some of those wrenches depending on hoses and tubes of the particular engine - see ???; otherwise you can take the coil pack off: 4 bolts, the underneath ones on more of a pedestal than the top ones).
> with a short 10mm closed end wrench snaked under hoses etc. the aft RH bolt of the front valve cover
> with a long extension on a 10mm socket all other front valve cover bolts.
- Chrysler could have done several small things to improve access to the RH side and back of the engine, such as hose clamp location, manifold pressure tap location, ground strap location/length, sensor orientation, and computer location. Kurmudgeon Keith thinks that all designers and managers should work in a vehicle maintenance shop on awkward unfamiliar vehicles for a week every two years. :-)
As well, they could have put locking devices on the valve cover bolts. They loosen, just like those on the Pontiac 4-cylinder engine that sometimes caught fire in the Fiero car. (It may be good practice to have loose fit of engine fasteners, but surely designers could have added a friction locking method, performance people have arched spreaders.)
TOOLS
- wrench adapter 7/8" (slotted to accomodate wiring harness to large electrical connector, see later in this section)
- penetrant to loosen sensor
- anti-seize compound for re-installation
You can reach the O2 sensor from above, after clearing stuff away as you have to do for spark plugs, easy if you have alternator and its mounting bracket out.
Probably better to come from below - from aft of the cross-member, which provides more space for wrenching, and you can see the sensor whereas you cannot from forward of the cross-member. Watch out for sharp things nearby. And note you may need lift higher than the normal 8 inch ramps, I have boards or metal equivalents to go under them, can't afford $700 for the 14" racer set.
Awkward to get penetrant spray can aimed correctly, perhaps a squeeze can as Liquid Wrench sold is better.
Disconnecting and reconnecting the sensor is a challenge on '93 Caravan as cable is to short and it is difficult to reach hand down far enough.
You have to deal with the connector in choosing a hex wrench, you can't use a normal socket. I use a special wrench adapter with a slot in one face and a 3/8" square hole to the side for a rachet or bar wrench, Performance Tools W84008. (but poorly made, 3/8" square hole is too tight for wrench to go in fully, I have to file it a bit). There are other types sold, a tall one with slot in side of shank is too tall for this engine. IIRC both from Canadian Tire stores. TEKTON 47749 appears to be the one I use. KUNTEC 10 Piece Oxygen Sensor Socket Set includes the one I use, as does Gear Wrench set 41720.)TEKTON 47749. 7/8" size of housing of sensor.)
Getting enough lever arm is a challenge, I forget how I did it, a 1/2 to 3/8 adapter on a 1/2 inch ratchet is worth trying, with a piece of tubing to lengthen it (collapsed to fit into place then slide longer).
In replacing the sensor:
- along the way trying tools I ended up with a thread cleaner tool
- I use a bit of anti-seize compound
An option is to remove the exhaust piping aft of the manifold to get more access, letting penetrant soak for a while, and being prepared to replace bolts.
An article on AllPar web site advises to take out the front engine mount bolt by the radiator, and let the engine rotate forward - but it looks to me as though there is little clearance from engine to radiator fan shround, and other proximities. HD cooling and AT cooler may reduce clearance.
There's something in that claim about parking brake and Park transmission selector position but it is garbled. And there's the matter of the RIH engine mount being high up so how can the engine rotate? Sounds tricky, as there is more than one bolt and multiple pieces in the service manual's instructions - perhaps the mount can simply be dropped from the front crossmember. The service manual cautions to support the engine to prevent rolling forward, and advises the RH mount is adjustable by about 2/3 inch but that seems tricky. I've concluded it is far from a practical approach.
- Or maybe remove intake manifold, then you can change the rear valve cover gasket too. That's the time to check rear fuel injectors if you want to. Take a week and do everything. ;-)
© Keith Sketchley Page version 2023.11.05
Please advise Keith if any links don't work or have become inappropriate - the Internet changes.
Back to Keith's Caravan maintenance page.