DODGE CARAVAN
This page provides brief advice on usability and reliability of the Dodge Caravan, which was also sold as the Chrysler Town & Country and Plymouth Voyager (and even as Chrysler Voyager in later years). I focus on the version produced in the early 1990s (through the 1995 model year), which has most of the inner structure of the original version. Later models may have substantial changes in the body structure, which might affect packaging-related factors. I expect that by 2010 the design is very different (including that it is reliable).
My experience is with a '1993 1/2' and a 1994 model, FWD, 3.3 litre engine, 4-speed electronically-controlled AT, with rear heat-A/C, high trim/options (lower body trim, lighting/sound/power opening/trip computer options).
I anticipate models from the beginning into the very early 90s will have more clearances, fewer hidden things as they did not have the functions, and lighter suspension parts. The models I've had use the same body structure as the original but with reflowed body panels (more rounded).
I anticipate that 1996 and later years of same design will have less clearance (access to rear of engine probaly worse, front suspension clearances may be worse). 1995 is the best year of the early 90s models as it had more fixes in (notably the transmission, which apparently was worse in 1996).
To replace your Caravan I recommend the design introduced in 2012 as it has been reliable (unlike your early 90s model), I know it was sold into 2019 despite introduction of the glitsy space compromised 'Pacifica' minivan for a far higher price. (Not to be confused (hah!) with the Pacifica station wagon of a couple of decades earlier.))
The 1993 and 1994 models with the 3.3L Chrysler pushrod engine and 4-speed AT are surprisingly efficient on relatively flat freeway for a large vehicle (aerodynamics are reasonable, rounded front corners), but not in very hilly territory nor in city traffic (due to their weight having to be accelereated or moved uphill). However the engine of the 2012 design should be more efficient (I don't know if the transmission has more speeds which would help fuel economy.)
But the 3.3L engine stuff job is very difficult to work on.
Table Of Contents
GENERAL INFORMATION
You should have the factory service manual to work on the vehicle, and desirably also the illustrated parts catalogue as its illustrations can be useful. There are thick diagnosis books for the engine control system and some other electrical systems, messy to work through. The SM is readily available, the IPC and diagnosis books hard to find because only dealers would have bothered to have them. Manuals may be available on CD/DVD now, perhaps through the troubled Chrysler Connection web site though it tends to have only newer manuals.
- Space
- Ride
- Bumpers vs curbs
- Tire chains
- 3.0 LITRE ENGINE
- 3.3 & 3.8 LITRE ENGINE
- Engine size
- Transmission
- Air conditioning
- Parts Substitution
- Theft
SPACE
The defining attribute of the Caravan was interior space in a low height package (so it would fit into standard car garages).
RIDE
To get that low height, suspension travel is limited. Thus ride on anything but smooth pavement is rough. (It is quite nice on smooth pavement, depending in part on the tires - with decent fuel economy on level roads it is a good freeway cruiser. My experience is with the single leaf rear springs - the multi-leaf heavy-duty rear suspension may ride rougher, and the all-wheel-drive suspension may be somewhat different.)
BUMPERS VS CURBS
Some bumper shrouds are closer to the ground (the fancy lower body trim package is closer to the ground). They catch on parking lot blocks that are higher than normal, the shroud rides over it but gets damaged when it catches as you back out of the spot. Ideally Chrysler's designers should have rounded the aft edge of the shroud so it would ride over the blocks both directions. You can replace the sacrificial pop rivets holding the aft side onto the frame, and put a strap over broken tabs, but the shroud may break at the ends of the slot opening in the front. Repair of that could cost several hundred dollars: a rebuilt shroud, paint work to match your colour, and remove & replace labour (it appears that you'd have to detach the fender liner).
TIRE CHAINS
The tight packaging design resulted in limited clearance between the front tires and the front suspension struts, thus making use of traction chains difficult.
With the larger tires common in the 1990s (P205/70R15) you must use low-profile chains, install them the right way around to lay flatter against tire sidewall, tighten them, and drive slowly.
Note that the shape of cable chains vary somewhat, especially with newer types being introduced - simply specifying "cable" or "radial" chains is not enough. You want simple ones with low-profile joints, space class S (not W or U or larger) - or preferably slimmer than space class S, such as the basic cable and Z-cable chains made by Shure Chain. Those are slim chains: 10mm, whereas the already slim S class limit is 15mm. Definitely cable chains, not conventional link chain. (The Z chain runs the cables diagonally across the tread for better performance with anti-lock brakes compared to the standard ladder-style cable chain.
Friends have an alternative, an assembly of plastic grips that clamp onto the wheel from the outside with minimal projection over the inner shoulder, named something like Spider Spikes. It is somewhat awkward to install.
3.0 LITRE ENGINE
The Mistubishi 3.0 litre V-6 engine is prone to premature wearout of valve guides and seals. People advise that if it is smoking you should expect to need to replace the guides, not just the seals as you might get away with on other engines.
Rebuilding both heads is expensive. However, as a silent-shaft OHC design the engine may be desirable, though it has a distributor thus more tuneup parts than the Chrysler engine (the 3.3/3.8 litre engine).
3.3/3.8 LITRE ENGINE
The Chrysler 3.3/3.8 litre V-6 engine is a conventional pushrod design with the cam in the block. Less costly to make, and providing torque which is useful in a big heavy vehicle, but lacking the silent shaft thus not as smooth in some driving conditions. It has electronic fuel injection and distributorless ignition.
Unfortunately it is a stuff job in the body structure which is really the original 1980s structure with gussied up exterior, so working on it is very time-consuming - especially as Chrysler did not relocate things like A/C plumbing and brake lines to maximize clearance for working on the engine. And went stupid on vacuum ports - they stick out of the back of the manifold, most aren't removable.
ENGINE SIZE
The Caravan was available with a 4-cylinder engine, but I expect it is rare except in the early years, as for a large vehicle it was low on power. (Unless someone turbo-charged it. A diesel was sold in Europe.)
Mileage on level highways is surprisingly good in my experience with the 3.3L and 4S AT, confirmed by others. (It does have sensible front-end aerodynamic shape.) This is a good freeway cruiser, efficient and roomy. Less useful around town due rough suspension, weight thus fuel consumption, and difficulty parking because you cannot see the rear corners (the body sides have a subtle curvature sufficient to obscure the rear corners - no discrete bumper ends to see, the Caravan is worse than the much longer Dodge Maxivan).
If you have the long body and heavy options like LH sliding door on newer models, load it with people, and climb hills you may find the 3.8 litre engine the best due to its greater torque. But don't abuse that light transmission underneath it.
Note however that the front-wheel-drive vans like the Caravan are not good trailer-towing vehicles. I suggest a truck-based design like the Chevrolet Astro/GM Safari or larger for durability (the Caravan and its competitors such as the Chevrolet Lumina/Montana, Toyota Sienna and Ford Windstar use beefed up versions of car components in their drive-trains, the Astro & kin use pickup truck components). Though I might be tempted by the new rear-wheel-drive performance sedans from Chrysler. :-) Naw, I think heft is good for towing - wonder if I could find a 1950s Chrysler 300 with a Hemi or similar biggie under the hood. (A dually pick-em-up is so "common" these days. ;-)
TRANSMISSION
The 4-speed automatic had reliability problems, from two primary causes arising from its light-weight design:
- fatigue of rotating components due poor mechanical detailing (fixed in later years)
- abuse (spinning wheels on icy pavement is risky, as the shock loading from hitting a dry patch is severe).
Chrysler improved the transmission over the first few years of production, so the 1995 model is good as long as it has not been abused.
In general the high degree of electronic control in this transmission works well. It is somewhat prone to malfunction from poor electrical connections - so before panicking check that the ground wires are electrically well attached. (One may be on a sub-frame at the left end of the transmission.)
Some owners have noticed a bit of jumpiness at very low speeds, perhaps due to the transmission not down-shifting all the way when the vehicle slows gradually to a stop thus having to downshift when it starts moving again. That is not of much concern, supposedly fixed in later versions.
The lock-up converter clutch housing may crack, leaking fluid thus not locking up strongly enough. Modified transmission programming may raise the lockup speed so it is not excercised as much on arterial streets. Of course the clutch friction surface will wear, as will other clutches in the automatic transmission.
AIR CONDITIONING
The A/C components are not as reliable as desired, though it is a tough job - lots of glass area, and some vehicles have a rear condensor but the same single compressor.
PARTS SUBSTITUTION
Vacuum lines
The fragile small rigid vacuum lines on the 3.3L engine are 3/32" ID (2.4mm) and 5/32" (4mm) OD.
5/32" ID vacuum hose will fit over the lines, but 1/8" would be better (7/64" will fit if heated, but you may never get it off).
Vacuum hose is flexible whereas fuel hose is too rigid to bend without putting too much stress on the rigid lines you connect to.
To adapt hose diameters, as nipples on manifold and throttle body are much larger than the plastic line, I've used multi-diameter plastic tees (Dorman is one brand in auto parts stores), and capped the leg not needed. Those tees have stepped diameter, you cut a leg back to the diameter you need.
To get the remnant of a plastic line out of a rubber elbow I turn a screw into the line then pull the two apart.
HIDDEN RELAY PANEL
And another poor access design feature is hiding a secondary relay panel in the left side of the dash (never mind that the service manual says center). Disconnect the parking brake release handle, remove five screws holding the lower dash left cover panel, remove four screws holding a strong-looking metal cover - and there they are! Lighting, rear hatch, rear heater & A/C, and a few other functions are hidden there. It is called �Relay Block�, diagram AS-HK 151 of the wiring diagrams in section 8W of the service manual (page 8W-206 of the one I have). 1993 may be different from 1994.
Not to be confused with the "Micro Relay Block", hidden behind the center of the dash. It has relays for options such as power windows, power door unlock, power seat, fog lamps and fancy speakers relay. (A relay for speakers? yes, on the wiring diagram for radio "with NBS". It feeds power to the optional speakers in the front doors and liftgate, which apparently require a power feed to them unlike regular speakers. In my vehicle those speakers are labelled Infinity, as is the radio. They are powerful.) Refer to wiring diagram AS-HK 152, which claims location is "right side of I.P." - perhaps the Instrument Panel ends in the centre stack and to the right of the interior is something else. Refer to "More Hidden Things" section below.
(Do keep in mind that the main relay panel on 1994 and 1995 models is beside the battery - most engine control fuses and relays are there, it is called the "power distribution center". The inside of the cover has labels. Typically there is a fuse for each relay. Note the yellow collar to quickly pull out the direct battery feed fuse (Ignition Off Draw, called "IOD" in wiring diagrams). The heavy duty fuses on the left side of the vehicle are fed by a rail connected to the red feed wire from the battery. (The other red feed wire is from the alternator, the two are connected together.) The small fuses that typically provide power to the switched contact of the relays as well as loads outside the panel are fed power in two groups, but both groups are fed from the common rail.)
Unfortunately the 1993 model has relays all over the engine compartment, I recommend carrying pages from the service manual to locate them for troubleshooting.
MORE HIDDEN THINGS
are revealed when you try to service the cigar lighter power socket in the centre dash area, or remove the bin or CD changer at the bottom of the center dash. If you wondered where certain relays and modules were, voila!
I believe the modules are:
- "body computer" (which the general service manual claims is "right of the steering column" but the body diagnostic manual specifically advises is here), probably with one blue and one natural colour 25-contact connector. It performs various utility functions and computes fuel mileage and trip data for the optional overhead console display.
(Note the body diagnostic manual specifically advises it is behind the left lower dash on 1993 model.)
- an airbag module (which the service manual claims is in the "centre rear of instrument panel"), with one yellow 4-contact connector and one black 13-contact connector. It is the more sealed and securely mounted module.
(Supposedly the transmission control module is on the right firewall forward side or RH fender shield (without and with 4WD), the ABS module if installed is well below the power centre (underhood LH), and a "powertrain control module" is immediately under the power centre location aka "LH fender shield (that module being what is called the "engine computer" by those of us who think the powertrain is both engine and transmission - note the transmission computer is a late addition to the Caravan as it is for the electrically controlled 4-speed transmission).
The relays are the "micro relay block" covered in "Hidden Relay Panel" above.
EVEN MORE HIDDEN THINGS
Under the battery tray, removal of which requires undoing three bolts, is a vacuum tank of some kind. Not fuel vapour evaporation control purge which is a round tank at front right corner of engine compartment. This one is a slim rectangle. Two thin hard plastic tubes go to it, more fragile than normal hoses.
And the remote door lock radio receiver module is under the top centre covering of the dash.
SPECIFIC SERVICING/MAINTENANCE
I presume you have a Chrysler service manual. Here I provide information not well covered in it. Some of the access I cover here is in the service manual if you can find it, often not in the section you'd expect it in - for example, check both the dash/instrument panel and specific-item sections.
Also check the error lists in the Rant section near the end of this web page.
(Among the tools you'll need are Torx screwdrivers, including size 20 for the grill/lights area and T15 to aim headlights, small metric wrenches such as 7 and 8mm for dash and small electrical including an 8mm socket for tailight housing, and a volt-ohmeter with scale appropriate for 12vdc systems (often meters have a 20 volt scale which is good as charging voltage is 14vdc, but some have only a 50 volt scale which on an analog meter gives too coarse a reading), high impedance type to avoid damaging sensors.) Also I suggest the meter have a resistance test scale with resolution of 0.1 ohm in the low range (say below 20 ohms), some cheap/compact meters only have 1 ohm resolution.
Of course some knowledge of mechanical and electrical things, including the effect of multiple connections on resistance readings, is very helpful. (E.G. if you whip out the fuel pump relay and measure resistance to the pump, you may actually be seeing the heater in the oxygen sensor which is connected in parallel - that's why the wiring diagram in the service manual is a Very Good Thing To Have. :-) And some general experience before you get into complex things or tight areas - e.g. the feel of starting bolt installation so you can avoid cross-threading.
TROUBLE CODES
Through 1995 the Caravan and siblings used the "OBD I" diagnostic code system.
You can read the stored codes as flashes of the Service Engine light, by turning the ignition key on then off then on then off then on. Unlike other brands you do not need to jumper a connector to see the flashes, just use the ignition key sequence.
Refer to the service manual or Allpar.com ( perhaps at) for the format and a list of codes. Note that one code will always be seen to indicate that the computer and light circuit are working and to help distinguish between repeats of the code list.
Recognize that the codes are only a good start for diagnosis - you may have to think through the function of the part or system that the code points to and test some parts. (The specific meaning of some codes varies with model year.)
The transmission computer stores data, requiring test equipment to read it. The computer can be reprogrammed - you might consider having that done by a dealer as factors such as the torque converter clutch lock-up have been changed. (Lockup speed was raised to reduce wear on the clutch, as it was coming on and off on arterial streets (with speed limit of 40 mph, but common practice of driving a few mph faster, the vehicle was often fluctuating around the original lockup speed.)
SENSORS AND WIRING
Refer to my sensors page for information on sensors and wire routing.
RELAYS
The 1993 1/2, and probably earlier years, have a mess of relays scattered around the engine compartment, that manuals do not fully identify. Disconnecting some of them is difficult, you need a blade to pry with, perhaps a tack remover or door upholstery removal tool (I recommend Lisle 35460 whose narrow end is thin and shank has rubbery grip material, PowerFist 2990063 is too thick). Some in forward left locations get corrosion on contacts. Good luck.
The 1994 year introduced a power centre behind the battery, with a cover identifying function, I describe it earlier on this page.
ENGINE CONTROL
I provide a list of errors in wiring diagrams.
Automatic shutdown relay is a tricky thing you may not have thought of, it shuts the fuel pump off.
Guidance on control of Automatic Shutdown Relay and Fuel Pump Relay by engine computer.
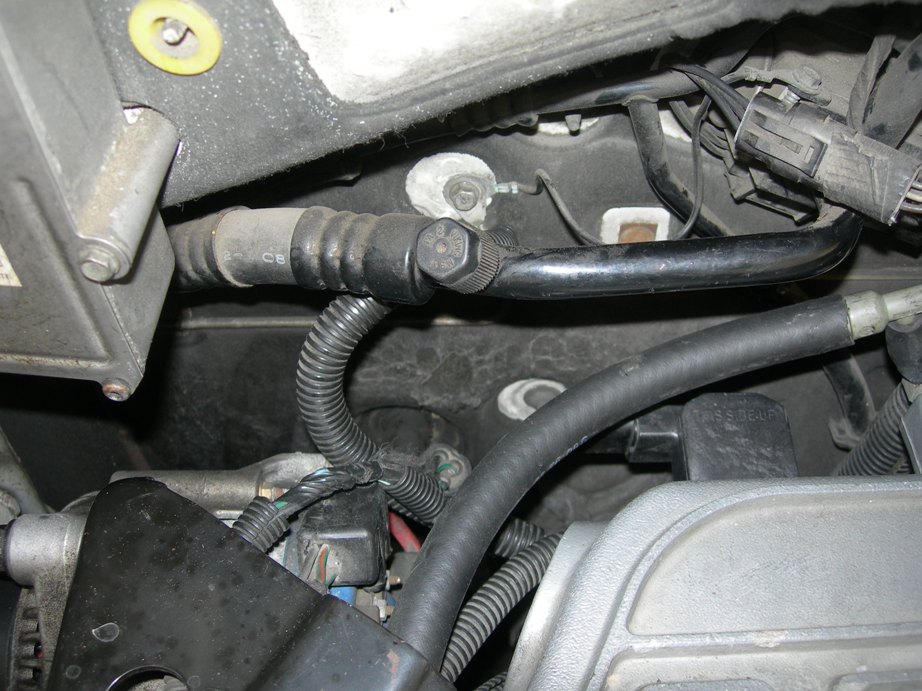
See for access to rear spark plugs and oxygen sensor on the 3.3L beast.
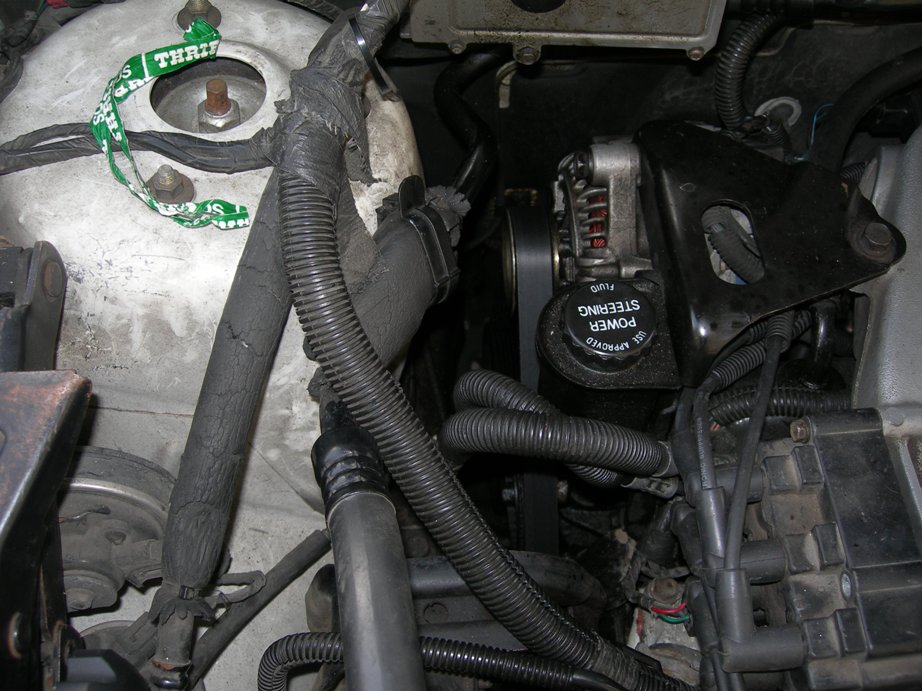
See for replacement of alternator on the 3.3L beast.
REMOTE KEY SYSTEM
With remote key fobs for any vehicle you should be careful not to sit on the fob. Some Caravan fobs required only a single press to unlock the rear hatch - a dealer should be able to reprogram that to require two presses.
HEATER FAN
For heater blower and right vacuum actuator information, refer to the centre & right dash area page, and the Heater Fan replacement advice page (another awkward job).
FUEL PUMP
See separate page.
For diagnosis note that other other loads on the fuse/relay may have to be disconnected to make a continuity check (such as the oxygen sensor heater).
Banging the bottom of the tank may get the pump going for long enough to get to a repair location.
REAR QUARTER WINDOW MOTOR
Note that the rear quarter window motor may be behind the rear edge of the window not down forward on top of the wheelwell (apparently installation redesigned - note the adapter bracket).
RADIO
Here are removal instructions for radio and speakers. On that site you can find some radio repair instructions, including inoperative display. The instructions are well worth the money both for the display and a general approach to other problems - I fixed my display and an intermittent volume problem (Infinity Radio-CD player). You should heed his general advice about what causes problems on the Alpine radios, be prepared to spend time on it, especially scrutinizing solder joints.
Note this alternate site name for Car Stereo Help.
And on the Allpar forum you can find instructions to tweak the single-CD player to better play recorded discs.
Among the dumb things Chrysler's designers did are:
SPARK PLUG REPLACEMENT
See my separate page to so you can remove and replace the engine spark plugs. Be prepared to go underneath the vehicle with it raised several inches, and with the less common tools detailed in that page. Yes, underneath!
VALVE COVER SEAL LEAKS
See my separate page on to so you can tighten the valve cover bolts to reduce leakage. Another underneath job. (I have not faced the question of how one would replace the seals - I wimped out and had a shop do it when they were in the engine bay for other reasons.
Or my intake manifold and fuel injectors page.for easy access to rear valve cover if you remove the intake manifold.
OXYGEN SENSOR REPLACEMENT
My page on spark plugs also covers the oxygen sensor.
ALTERNATOR REPLACEMENT
See my separate page to so you can remove and replace the engine alternator. Be prepared to go underneath the vehicle with it raised several inches, and with the less common tools detailed in that page. Yes, underneath!
ENGINE ACCESSORY DRIVE BELT
See my separate page to so you can replace the engine accessory drive belt and prevent it from popping off in heavy rain or snow. Be prepared with the less common tools detailed in that page.
WATER PUMP
See for instructions.
FUEL FILTER
See separate page.
EGR VALVE
VACUUM LINES
See separate page.
Removing the throttle body c/w things that are attached to it is probably the best wasy to get at the EGR valve. (Take note of which vacuum line is which on the EGR solenoid that is on top of throttle body.) You have to remove the air inlet duct and top of air filter box first.
Chrysler's thin plastic rigid lines break, especially the one to the EGR valve which is exposed on the back of the manifold. (Others have rubber hose at each end.)
I replaced that one with rubber hose, using a multi-diameter union or tee to accomodate the different diameter of each end. The multi-diameter items, Dorman being one supplier, are intended to be cut off to suit the need. With a tee you can cap the unused leg, auto-parts stores sell those too.
7/64 ID windshield wiper vacuum hose will fit over the rigid line (NAPA H458, half a century ago cars used vacuum to power windshield wipers).
See separate page.BODY
HEADLIGHT COVER
Refer to the Headlight Cover Replacement page. The new headlight covers I purchased suck in water!
WINDSHIELD
The windshield is glued in, replacement seems like a job for a good automotive glass business.
DOOR LINING FRONT
Refer to the Door trim and mirror removal, and switches. page.
REAR HATCH LINING
Refer to the Rear hatch lining page.
SPARE TIRE HOIST
The cable may rust, potentially dropping your tire on the road in the path of another vehicle. Delay that by using corrosion inhibitor, I suggest WD40 which is is thick enough to form a film for a while.
The hoist is replaceable as an assembly, not a difficult job though you should put penetrant on bolts before starting. Take money to your Chrysler/Dodge dealer and they'll sell you a new hoist.
LOOSE PIECES
Fortunately I noticed the left end of the rear hatch outside handle was loose before pulling broke it.
The leftmost screw had come loose, it fell out in my hand.
The one next to it was not as tight as it should have been, the others were fine.
DOOR ADJUSTMENT/SAG
See my separate page to so you can adjust door sag and learn of a fatigue problem. Be prepared with the uncommon tools detailed in that page.
I attach a flat bungee cord between door grab handle and instrument panel structure to help prevent damage to door and fender from high wind catching it, also reduces risk of opening door dentisng someone elses car or getting in the way of a bicycle.
PARKING BRAKE PEDAL ASSEMBLY
Fix wear or replace it. An adventure that will reveal hidden goodies of electrical nature.
POWER STEERING RACK
Beware that the clamp holding the RH end of the rack can rust away, or fatigue due improper manufacture (recent Chrysler replacement parts are junk). Catch it early and you won't have to replace a broken rack.
FRONT BRAKES
A fiddling job - be prepared.
REAR BRAKES
A worse job - be prepared.
Maintainability - NOT
Poor routing firewall
Poor routing right side
Poor routing of line to A/C compressor
Misc errors in manuals.
Errors in wiring diagrams in manuals.
© Keith Sketchley Page version 2023.11.05
Please advise Keith if any links don't work or have become inappropriate - the Internet changes.